The microscope in cell studies
Introduced| English | Meaning |
|---|---|
| microscope/ˈmaɪkrəskəʊp/ | An instrument used to magnify objects too small to see clearly with the unaided eye. |
| light microscope/laɪt ˈmaɪkrəskəʊp/ | An instrument that uses visible light and lenses to produce a magnified image of a specimen. |
| specimen/ˈspesɪmən/ | An individual organism, sample or prepared material selected for observation or study. |
| electron microscope/ɪˈlektrɒn ˈmaɪkrəskəʊp/ | An instrument that forms a highly magnified image using a beam of electrons. |
| magnification/ˌmæɡnɪfɪˈkeɪʃn/ | The ratio of an image's size to the corresponding actual size of the object. |
| resolution/ˌrezəˈluːʃn/ | The ability to distinguish fine detail or closely separated features. |
| stain/steɪn/ | A colouring substance used to increase contrast or identify particular structures in a specimen. |
| eyepiece graticule/ˈaɪpiːs ˈɡrætɪkjuːl/ | A small scale fitted in the microscope eyepiece, used to measure specimens once calibrated. |
| stage micrometer/steɪdʒ maɪˈkrɒmɪtə/ | A slide etched with an accurate scale, used to calibrate the eyepiece graticule. |
Seeing the invisible
- Cells are far too small to see with your eyes — you need a microscope 显微镜.
- A light microscope 光学显微镜 shines light through a thin specimen 标本; an electron microscope 电子显微镜 sees far more detail.
- Two ideas you must keep separate: magnification 放大倍数 and resolution 分辨率.
Microscope decision lab
Choose the right microscopy idea from what the student wants to see.
Light and electron microscopes
- A light microscope shines light through a thin specimen on a slide (with a stain 染色剂 to show parts, and a cover slip on top).
- An electron microscope uses beams of electrons, which have a much shorter wavelength — so its resolution is far higher and it shows tiny structures.
- Two kinds: scanning (SEM, 3-D surface) and transmission (TEM, inside detail through a thin slice).
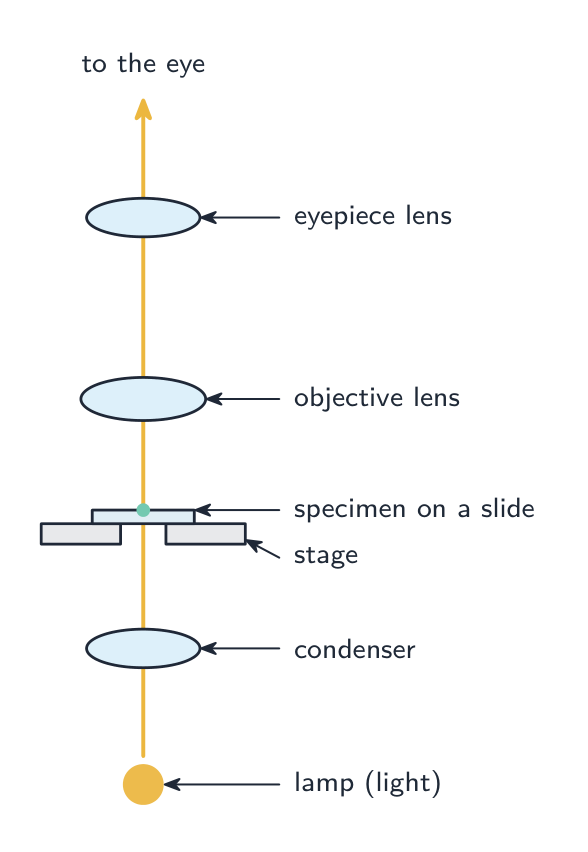
A light microscope shines light up through the stained specimen and lenses magnify the image
Why does an electron microscope have a much higher resolution than a light microscope?
Difficulty 1/5 · 100 coins + a small bonus on first completion today
Shorter wavelength → higher resolution, so finer detail can be seen.
Match each feature to the right microscope.
Difficulty 2/5 · 140 coins + a small bonus on first completion today
Light microscopes are simpler and can view living material; electron microscopes have far higher resolution but the specimen must be dead and in a vacuum.
Magnification and actual size
- The top and bottom must use the same unit. Cells are tiny: $1\ \text{mm} = 1000\ \mu\text{m}$, $1\ \mu\text{m} = 1000\ \text{nm}$.
- Worked: at $\times 5000$, a chloroplast measures $25\ \text{mm}$ → actual size $= 25 \div 5000 = 0.005\ \text{mm} = 5\ \mu\text{m}$.
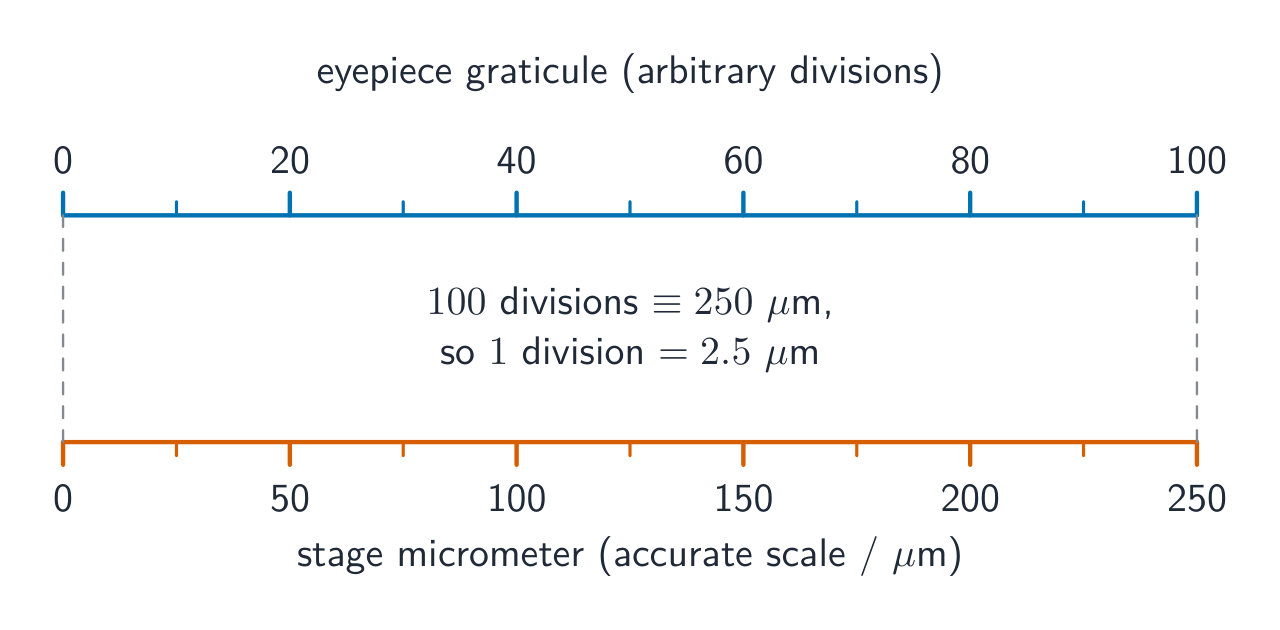
Calibrating the eyepiece graticule 目镜测微尺 against a stage micrometer 载物台测微尺
Which equation gives magnification?
Difficulty 1/5 · 100 coins + a small bonus on first completion today
Magnification = size of image ÷ actual size (no units).
How many micrometres (µm) are in 1 mm?
Difficulty 2/5 · 140 coins + a small bonus on first completion today
1 mm = 1000 µm (and 1 µm = 1000 nm).
At magnification ×5000, a structure measures 25 mm in the image. What is its actual size, in µm?
Difficulty 2/5 · 140 coins + a small bonus on first completion today
25 mm ÷ 5000 = 0.005 mm = 5 µm.
Resolution vs magnification
- Magnification = how many times bigger the image is.
- Resolution = the smallest distance between two points that still lets you see them as two separate points.
- Making an image bigger does not always show more detail — past a point you just get a bigger blur. Resolution sets the real limit.
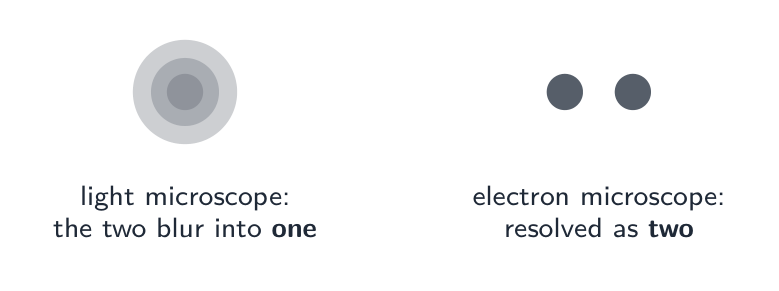
With low resolution two close points blur into one; higher resolution keeps them separate
Resolution is:
Difficulty 1/5 · 100 coins + a small bonus on first completion today
Resolution is the detail limit; magnification alone cannot show detail finer than the resolution.
The smallest distance between two points that can still be seen as two separate points is the ______.
Difficulty 1/5 · 100 coins + a small bonus on first completion today
Resolution is the real detail limit; magnifying beyond it just gives a bigger blur.
Magnifying an image more and more always reveals more and more detail.
Difficulty 1/5 · 100 coins + a small bonus on first completion today
No — beyond the resolution limit you just get a bigger blur. Resolution, not magnification, sets the finest detail you can see.
Prepare a thin specimen
- Place a thin piece of onion epidermis in a drop of water on a clean slide. Add a suitable stain under your teacher's instructions; use eye protection when required.
- Lower one edge of the cover slip first, then lower it gently to reduce trapped air. Start with the low-power objective, focus and centre the cells before increasing magnification; use fine focus at high power.
A student places a thick folded piece of onion epidermis on a slide and drops the cover slip flat onto it. Explain two changes that would make individual cells easier to observe.
Use one thin, flat layer so light can pass through and cells do not overlap. Lower the cover slip from one edge to reduce air bubbles; bubbles can obscure cells. Start on low power to locate and centre the specimen.
Draw what you can see
- Make a large drawing with clear, unbroken lines and no shading. Show wall thickness with two lines where you can resolve it. Keep the proportions of the observed cells; do not add parts simply because a textbook diagram has them.
- Use straight label lines that touch the structures and do not cross. Give a title and include a scale bar or the calculated drawing magnification when the source provides enough size information.
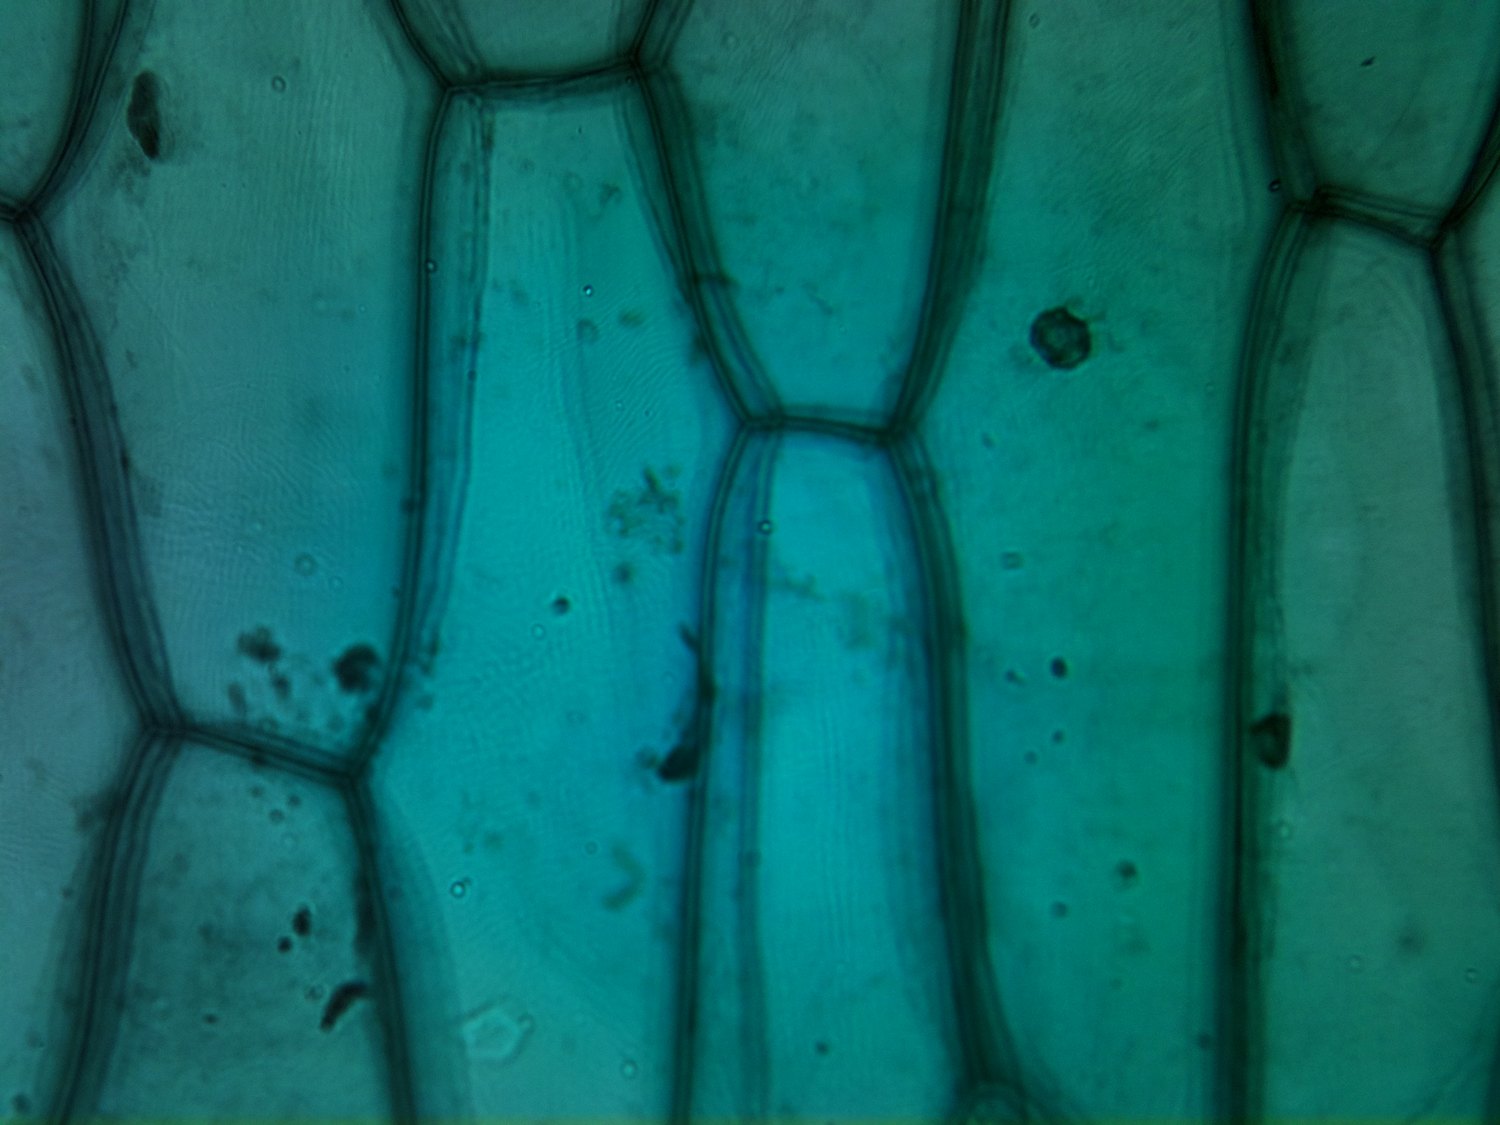
Observation task image: onion epidermis. Some cells are cut off by the photograph's edge. No calibrated scale bar is supplied.
Photo: loganrickert, Wikimedia Commons, CC BY 2.0; unchanged.

A student draws chloroplasts in an onion epidermal cell although none are visible, shades the cell and crosses two label lines. Explain how to improve this biological drawing.
Draw only the structures observed, so omit the invented chloroplasts. Use clear, unshaded lines and show wall thickness where visible and straight non-crossing label lines that touch the structures. Keep the observed proportions and add a title and scale information when required.
Use the onion photograph above. On paper, draw the visible parts of three adjoining cells. Keep their relative lengths, widths and shared boundaries; show where cells leave the frame instead of inventing their ends. Label one clearly visible cell wall and add a title. Then write here one feature you drew from observation and one change you made after comparing your drawing with the photograph.
Drawings vary with the chosen cells. Check the drawing against those same cells: elongated outlines, unequal widths and positions of adjoining walls should match the image. Use clean, unshaded lines; show the observed wall thickness, not a memorised ideal rectangle. Label a visible wall with a non-crossing line. Do not invent chloroplasts, unseen ends or a scale bar. Record a specific correction, such as changing a cell width to match its neighbour. This written reflection does not verify the drawing; retain the paper for teacher review.
Using the same photograph, describe two visible features of the tissue. Can you find the actual length of a cell in micrometres from this displayed image alone? Explain. A student says that every small dark spot must be a chloroplast. Evaluate that claim using what the photograph can establish.
Visible features include elongated adjoining cell regions, clear walls and variation in cell width. The displayed image has no calibrated scale bar or reliable display magnification, so its pixel or screen length cannot give the actual cell length. A dark spot alone does not identify an organelle: stain, debris and other cell contents can also appear dark. The photograph does not establish that every spot is a chloroplast. Do not infer that a structure is absent from the whole cell just because it cannot be resolved here.
Calibrate the eyepiece scale
- An eyepiece graticule is a scale seen through the eyepiece. Its divisions have no fixed real length until you compare them with a stage micrometer, a slide with known distances.
- Align two marks, then find another pair of matching marks. Divide the known stage distance by the number of eyepiece divisions between the matching marks; use this value only for that objective lens.
- A stage micrometer has divisions of $0.01\ \text{mm}$. Twenty eyepiece divisions span eight stage divisions: $8\times0.01=0.08\ \text{mm}=80\ \mu\text{m}$.
- Each eyepiece division represents $80\div20=4\ \mu\text{m}$. A cell spanning 13 eyepiece divisions is $13\times4=52\ \mu\text{m}$ long.
At one objective, 25 eyepiece divisions span 0.10 mm on a stage micrometer. A cell spans 18 eyepiece divisions. What is its actual length?
Difficulty 2/5 · 140 coins + a small bonus on first completion today
0.10 mm = 100 µm. One eyepiece division = 100 ÷ 25 = 4 µm; the cell is 18 × 4 = 72 µm.
A new objective needs a new calibration
- A higher-power objective makes the specimen image larger against the eyepiece scale. One eyepiece division now represents a smaller real distance.
- Calibrate again after changing the objective. Do not reuse the old micrometres-per-division value just because the eyepiece has not changed.
Enlarging a printed micrograph changes its printed magnification. A scale bar enlarged with the image still gives a valid size comparison; use the image length divided by the scale-bar length, multiplied by the bar's stated real length.
Using a higher-power objective, 40 eyepiece divisions span 0.08 mm. A student uses the previous calibration of 4 µm per division for a cell spanning 15 divisions. Calculate the correct cell length and explain the error.
0.08 mm = 80 µm, so the new calibration is 80 ÷ 40 = 2 µm per division. The cell is 15 × 2 = 30 µm long. Reusing 4 µm gives 60 µm, twice the true value. A new objective changes the specimen image size relative to the eyepiece scale.
In an enlarged micrograph a scale bar labelled 10 µm measures 8 mm on the screen. A cell measures 28 mm on the same screen. What is the actual cell length?
Difficulty 2/5 · 140 coins + a small bonus on first completion today
The cell is 28 ÷ 8 = 3.5 scale-bar lengths. Its real length is 3.5 × 10 = 35 µm. Both screen measurements use mm, so their ratio has no unit.
In a supervised laboratory, prepare a thin onion epidermis slide using your teacher’s stain and safety procedure. Focus and centre cells on low power. Calibrate the eyepiece scale against a stage micrometer, then measure a cell. Record the objective, stage distance, matching eyepiece divisions, micrometres per division, cell divisions and calculated length. Draw an observed cell on paper. Change objective, recalibrate and measure the same cell if you can relocate it. Record your measurements and explain any difference. If equipment is unavailable, record “practical pending”; do not invent results.
This is a practical record, so there is no fixed numerical answer. Use a thin flat specimen, reduce bubbles by lowering the cover slip from one edge and follow the teacher’s focusing procedure. For each objective, convert the known stage distance into micrometres and divide by the matching eyepiece interval. Multiply that calibration by the cell interval. The same cell should have approximately the same actual length at both objectives, allowing for reading and boundary uncertainty. Check that it is the same cell and that the new calibration was used. Keep the slide observations and drawing for teacher review. Online self-review is not a practical-skill pass.
You've got it
- light microscope (light, lower resolution) vs electron microscope (electrons, much higher resolution)
- $\text{magnification} = \dfrac{\text{image size}}{\text{actual size}}$ — same units top and bottom ($1\ \text{mm}=1000\ \mu\text{m}$)
- resolution = smallest distance to see two points apart — it sets the real detail limit
- calibrate the eyepiece scale against a known stage distance for each objective
- prepare a thin specimen and draw observed structures in proportion
- magnifying more doesn't add detail beyond the resolution
A structure measures 18 mm in a micrograph at magnification ×600. Calculate its actual size in micrometres. Show the unit conversion and division.
18 mm = 18000 µm. Actual size = 18000 ÷ 600 = 30 µm. Magnification is a ratio and has no unit.
A cell image is 42 mm long at magnification ×3500. Find the actual length in micrometres.
Difficulty 2/5 · 140 coins + a small bonus on first completion today
42 mm = 42000 µm; 42000 ÷ 3500 = 12 µm. Convert the units before dividing.